 |
|
| Before we start, let's define what vectors are and why are they different (better/worse) than bitmaps. | |
| To put it plain and simple: they are bunch of mathematical-described polygons. That means they are not, as opposite to bitmaps, constructed from pixels. As such they won't "break apart" if you'll zoom picture in or out, since computer automatically calculate it's shapes (see picture 1). To get a feel of how vectors work, check out animated gif on the left. | |
| As you can see, line is not actually "line" there,
but two objects (big and small) placed together. What makes vectors so handy to use is their file size and speed. Because of their "mathematical" nature, they are much smaller and faster to work with than bitmaps. For example, picture that would normally took 20 MB can be reduced on 100 kb or less- in best quality. That's nice. But are they hard to work with? Primary was work with bitmaps and vectors very much different... but with new programs such as Illustrator, Corel Xara and especially Flash, the line between this two formats is fading away. |
|
|
Click on pic1 to see bigger version
|
|
| Are there any down-points, regarding vectors? The only one i can think of, is the inability to use effects like "motion blur", etc... That's why it is still recommended that you sometimes mix bitmap and vector graphic. | |
|
|
|
| We'll make a little picture as an example, scan it, convert
it and import it in Flash for coloring (we'll skip the process of hand-drawing,
as this would require separate chapter). NOTE: I'm using Flash 4, so there's a chance some things are handled differently in newer versions. |
|
| STEP ONE- scanning |
 |
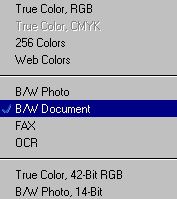
| Picture that will be converted in vectors must be scanned in Black&White mode (NOT in Grayscale!). See picture 2. Also resolution should be as high as possible- 400DPI is minimum. | |
| STEP TWO- converting | |
| Now that you have bitmap picture on computer, it's time to convert it in vectors. There's a lot of programs that will do this task, so it's up to you to decide which one will suit your needs the most (Personally, i'm using some fairly old version of Adobe Streamline- it's fast and simple to use). Converting alone, shouldn't give you too much problems. If the results won't be as expected, play with options a bit. Note: the "Tolerance" should be on maximum ("tight"). Save converted pic in .ai file. |
 |
STEP THREE- importing in Flash |
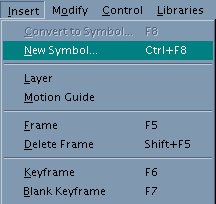
| Run Flash and in "Insert menu" click on "New Symbol". You'll be brought on new screen. Import .ai files (btw, if it's animation, save it as "01.ai", "02.ai", etc... so Flash will recognize it and ask you if you want to import all animation at once). Go into "Edit" menu and click on "Edit Movie". You'll be brought back on original screen. Now go into "Window" menu and click on "Library", in new window that pops out select "Symbol 1" (or however you named it) and pull it out into main working screen. Now add as many frames (NOT key frames), by pressing F5 in time-line, as animation is long and that's it! If you'll now resize one frame, all animation will be resized at once (useful for game's sprites, that need to be resized to match the settings). |
| STEP FOUR- preparation for coloring in Flash |
 |
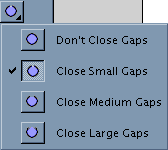
| Select imported picture and go in menu: Modify and select the option Break Apart (or simply press: CTRL B). Since your drawing is now "selected", click anywhere else on working screen to unselect it. Now let's take a look on the improvement, that makes Flash so easy to use (if you are used to classic bitmap programs). When you "break apart" image, you actually get real lines (and not bunch of polygons, as presented on animated gif above), that means you are able to break them, color them with different colors etc... Great thing is also, you don't need to close lines, to color space "inside" them. Just use the "fill" tool and press the small icon with circle drawing in the left menu and new options, where you'll be able to choose between 4 possibilities: from "Don't close gaps" to "Close large gaps", will pop out (see picture 4). | |
| Coloring on it's own shouldn't give you much problems. If you ever worked with any raster program, such as Paint Shop etc., you should feel right at home in no time. | |
| That's it. Following this tutorials you should be able to learn basics of working with vectors. Don't be discouraged if at first results won't be exactly what you expected. With a bit of practice, you'll be able to spit out great results. |
PROGRAMS AND ALTERNATIVES: |
| If Flash (www.macromedia.com)
is not your cup of tea, you can try out Toonboom (www.toonboom.com).
Toonboom is similar as Flash, but it's a bit more adjusted to classic animation.
Choosing between this two is completely a matter of personal preferences.
Download demos on their web sites and decide for yourself. Streamline can be found on (www.adobe.com). However there's a lot of other "bitmap to vector" converters out there. Some of them are even for free. One of those is WinTopo (homepage.ntlworld.com/softsoft/wintopo/index-free.htm). |
EXAMPLE: |
| To see an example of how can vectors benefit game-making, you can download
short adventure-game demonstration (all characters animations in this game
were done in vectors). Go to this page to download it: pdweb.htm |
| E-mail to author |